How To Start A Blog: Step By Step Guide To Creating A Real Business From Scratch
- Posted on January 16, 2023
- Make Money From Home
- By admin
- 4220 Views
[ Work From Home Jobs NJ | 53 Ways to Make Money Online | Best Businesses to Start | How to Start a Blog | How to Start in Affiliate Marketing | Best Affiliate Niches | Best Affiliate Networks to Join | Affiliate Marketing Myths Debunked | Starting a Business in NJ (A-Z) | Best online Courses ]
Start a Blog Today: Everything You Need to Know to Start Bogging and Make Money

Welcome
My name is Charlie and I’m the owner of FunNewJersey.com.
I have 17 years of experience in the blogging and digital marketing industry and I’m going to show you firsthand how to build a successful blog.
From A-Z. Every single step and every single little nuance.
Know the end before you begin
I cannot stress this point enough.
This first thought is usually one of the hardest to wrap your mind around and one of the hardest to accomplish.
It is also one of the most important steps if you want to succeed.
Knowing your endpoint before you start will increase your chances of success by 1000%!
Have a Destination Before You Set Sail For it
(Also known as a business plan)

I often use this analogy when I explain this to new bloggers
If you are the captain of a ship and you set it out to sea without a destination, you might surely end up somewhere but you will have no idea where that endpoint is.
But if you are a captain of a ship and you’re leaving from New Jersey (as an example) and your goal is to sail to Bermuda.
Chances are (and I would bet on it) that you will absolutely get to Bermuda!
You may run into rough seas, and other obstacles, but you will surely forge forward because you had a definitive pan and you knew where you’re going!
Should I have a destination for my blog?
Absolutely, yes!
And I am going to show you exactly how to do figure your destination out.
But first, let’s go over a quick definition of what a blog is.
What is a blog?
A blog is a website that is usually a little bit more informal and written conversationally from a person’s point of view about something that there are passionate about. It is usually targeted around one particular subject or idea where the blogger is an expert in their field about what they are blogging about.
How can I monetize a blog?
You can monetize a blog by reviewing and promoting other people’s products and services as an affiliate. You get paid a commission every time you sell somebody else’s product. You can sell your own products, services, or paid membership plans. You can also monetize your blog by getting traffic to it and serving ads on it or by selling ad space to others.
HERE IS HOW TO START A BLOG FROM A-Z
Step 1. Write down at least 20 of your passions

What to blog about?
What we are trying to define here is what the heck are you going to actually make a blog about?
Something you are passionate about of course!
So, what you want to do is write down all of your passions.
The ClickBank affiliate marketing course recommends that you write down at least 20 of your passions.
Some of your passions may include music, travel, little terrier dogs, cars.
It doesn’t really matter what your passions are, but finding a passion that you want to build a blog about is what you are trying to accomplish.
Just write down 20 of your passions.
You can check out our list of 300 + niches to get ideas of what you might be passionate about.
Step 2. Choose Your Niche (The main subject of your blog)

Take your passion and narrow it down into a niche
Take one or two things that you are most passionate about from step 1 above and narrow it down to something more specific.
For example: If you are passionate about fishing, try to narrow it down to a more specific aspect of fishing.
Ideas might include: Best fishing rods, best freshwater lakes to fish in, or a local party boat fishing directory.
It is highly recommended that you choose a niche that you are very passionate about, one that you have a lot of interest in, and one that you are an expert in.
If you’re not quite an expert yet in what you are passionate about, you must make sure that you have the drive and will work hard to be an expert in that field.
Chose a subject that you are passionate about
The bottom line is that you need to find something that you’re passionate about and that you know a lot about.
Yes, you can build a blog if you do not have those two ingredients.
But I do not recommend it.
The reason I don’t recommend it is that you will most likely lose interest and quit.
We need to go from broad to more targeted
Hers is our own resource to help you define a niche that you may want to promote.
See over 300 + marketable niches.
Using this resource, you should hopefully be able to come up with a niche to create your blog around.
In my opinion, I think that the following markets are good ones to dig into for a good niche. Business, technology, finance, education, pets, and gadgets.
Example:

If travel is one of your passions and you decided that you want to write a blog about travel, you need to narrow it down into a more targeted niche.
Travel is a broad term and within a broad market. You need to find something that is more targeted.
The more targeted your idea the better your chance for success is.
A good idea for the travel market might be a targeted blog about where you can take tours all over the United States.
A better idea would be to write a blog about where you can take tours just in New York City.
Why is it a better idea?
Because it is much more targeted and you can really easily define your audience.
Please understand that these recommendations for choosing a niche that is narrowed down to a more targeted subject with a more defined audience are suggested for new bloggers.
New bloggers will have a better chance of success with this strategy.
But can I still build a blog around the broad market?
Yes, you can.
As a matter of fact, that’s exactly what I did when I built FunNewJersey.com.
I went for the broad market of all of the fun things that you can do in New Jersey.
Then I broke it down to all of the fun subcategories like outdoor adventures, things to do with kids, romantic getaways, best restaurants, and over 1000 other categories.
I chose this route because I did have a little bit more experience in digital marketing, SEO, and blogging and, I was purposely shooting for a bigger picture.
But I knew what I was getting myself into and I knew that it was going to take years and years to get off the ground. Which it has. 17 years and running.
I could have easily niched down to just the best restaurants, or just the best bed-and-breakfasts in NJ and just built a blog exclusively about one of those subjects.
Homework you need to do before step 3
This is where you need to take the time and decide on what you want to build your website about.
If you are not a hundred percent sure. That’s okay.
Most newbies get stuck at this step.
I recommend that you read How to Start in Affiliate Marketing and then return here if you are having trouble finding your niche.
There is a lot of information in that article that is related.
If you’re still not sure, try to come up with 5 or 10 niches that you’re really interested in before you move on to step three.
Important Note:
If you are still truly undecided and you really just can’t pick a topic (niche), then just pick (any) one of your passions.
You do not want analysis by paralysis to set in. This happens all too often.
People just can’t decide what they want to do and they never start and get anything off the ground.
My advice is for you to just take an idea even though it is not maybe your perfect idea and just run with it for now.
You will learn a lot from just getting your hands dirty.
Step 3. Validate Your Niche
This is when you need to do research and see if the niche you have chosen is marketable.
There are 4 key factors to look for when validating your niche:
Key Factor #1 Search Volume
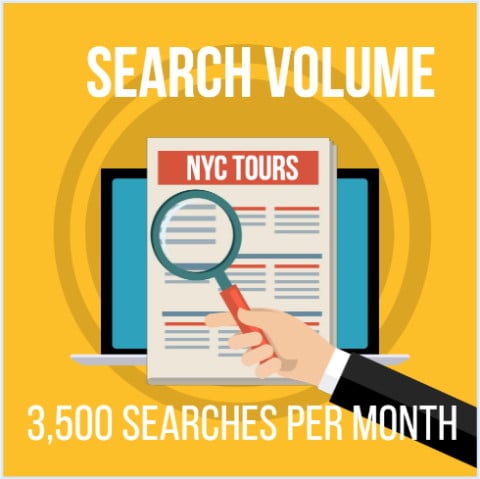
You want to make sure that your niche has a good search volume and you are able to monetize that volume.
Search volume simply means how many people a month are searching for terms related to your niche.
You can use tools like Ahrefs or SEM Rush to do keyword research so you can see what the volumes are certain searches.
For the sake of explanation, I have done the research and I have found that there are a lot of tours and a lot of websites about tours in NY and New York City.
I like this niche and here’s why
It has a decent search volume.
Search volume anywhere between 200 and 2,000 is decent. (The higher the search volume, the more competitive it is and harder to rank for generally speaking)
I used Ahrefs for this example.
There are many terms related to NY tours, but I’ve just listed a few here for demonstration purposes.
NYC tours 3,500
NYC food tours 1,800
free walking tours NYC 1,700
bus tours NYC 1,200
food tours NYC 1,200
boat tours NYC 400
tours in NYC 500
foods of NY tours 450
best NY city tours 400
best tours in NYC 400
bus tours in NYC 200
Niagara Falls NY boat tours 200
food tours in NYC 150
wine tours buffalo NY 150
In this example, I have validated the niche as far as volume goes
Which means I would be ready to start building a blog around it!
For me, these keyword volumes have validated that is a good niche. Even though the niche is competitive, I feel I still have a good chance of taking market share.
Also note that by doing this research, we already have ideas of subcategories to create on our blog and articles to create!
Key Factor #2 – How difficult will it be to rank in this niche?
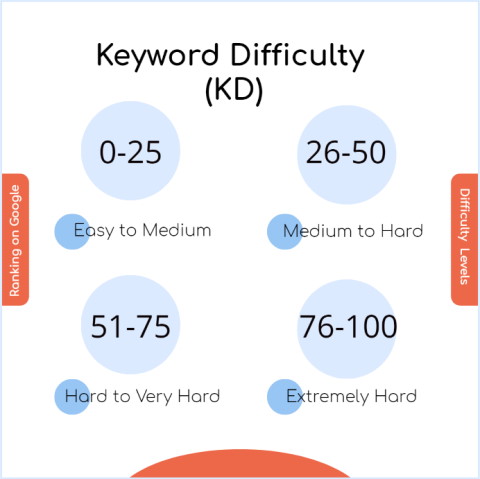
Keyword Difficulty
Another great thing about using the tool Ahrefs is that it gives you the keyword difficulty score, which ranges from 0 to 100.
Zero means that there’s literally very little competition and your chances of ranking high in getting traffic are very high.
From the list above;
“wine tours Buffalo NY” has a volume of 150 and keyword difficulty of 0!
Guess what that tells me. I am going to write a blog post about that!
We call that low hanging fruit in your niche.
Keywords that are less competitive and easier to rank for are what we allude to as low hanging fruit.
I also found quite a few other keyword phrases that had a lower keyword difficulty which further validated my thoughts that this would be a good niche to move forward with.
Key Factor #3 – You want to make sure that you can make affiliate income from your niche.

This factor is pretty important.
Just choosing a niche that you’re passionate about is not quite enough.
To make money with your blog, you’ll need to monetize it by either getting a lot of organic traffic (which is not going to happen in the very beginning) or by selling ads to start generating decent paid traffic (which is the best way to get started with making money) when your blog is brand new.
You will need to do extensive research to see what your competitors are doing within your niche.
What types of ads are they running?
Are they running profitable ads?
Can you run similar ads so you can take a small market share initially and so you can ultimately make some affiliate revenue with your blog.
You will need to get savvy with search engine optimization and learn how to rank keywords that will drive affiliate revenue. You will also need to learn how to run ads
Here is some secret sauce:
It’s always a good idea to look for the word “best” when you are looking for keywords to market in your niche.
You have a much easier time to rank for these types of keywords.running a
It’s a good place for you to start when you have a new blog.
Also when you’re doing your keyword research, make sure that there are affiliates for the content that your writing.
If I spent 40 hours creating an article about “boat tours in NY”, but there were no affiliates for that term, I would have a pretty good content piece, but I wouldn’t have a great chance for it to make money.
Key Factor #4 – Have a unique selling proposition

Have an angle that will make your content stand out.
What advantages can you give to your audience that your competitors are not?
What can you yourself bring to the table that nobody else is bringing?
Here are some ideas of can better advantages I might have based off of my tours example.
A. Maybe I live in New York City, and I could go on the actual tours myself and take really strong footage that my competitors do not have and use that on my blog.
B. I can come up with a unique concept where I can recommend the best tours to take based on the amount of time that you will be visiting the city.
So if you are in New York for only one day I would recommend the top 3 tours to take. Or if you had 3 days visiting the city, I could recommend a 3-day itinerary of the best tours.
C. I could create a portal where you can sign up, and save your favorite tours for the future.
These are just ideas, but the point is for you to be a little bit different and stand out against your competition.
Now it’s your turn to validate your niche
Another way to validate your niche is to search for it on Google.
Is there a lot of ads for the keyword phrases that you’re searching for?
If so that’s a good inkling that people are already making money in that niche.
Also, look to see what the result pages are for your searches. Are the websites that are coming up on the first-page quality?
Do you feel that you can write better content and beat their quality?
Can be more authoritative than the pages that are ranking currently in Google?
If the answer to those questions is yes, that is further validation that you should move forward with your chosen niche.
Take your time at this stage
If you’re stuck just keep repeating steps 1, 2, and 3 here.
You want to make sure that you are all in before you move forward.
And you certainly don’t want to choose a niche that is not marketable because you will just be wasting your time.
Once you have completed these first 3 steps, you are ready to start building your blog.
At this point, you are ready for step 4!
You know that you’re passionate about the niche you have chosen, you know that you want to build a blog about it, and you know that there’s a market for it.
You have a good idea of the subcategories you want to build on your blog and a good idea of the content you’re going to build.
You. my friend, have just gotten the hardest part out of the way!
Congratulations!
You are already on your road to success!
Before We go to Step 4, We Want to Recommend This Amazing Course
You should absolutely take this free training to learn how to build your profitable affiliate blog. In the Authority Hacker course, you will learn everything that we are teaching you here but a little bit more in-depth.

If you really want to learn how to start a blog and make money, we highly recommend that you take this course.
Register now for the free course or head on to step 4 below.
Step 4. Set your goals and write them down

This is also a very important step
You should first define the real reason that you want to build this blog.
Is it because it’s just a hobby and you don’t really care about how to go about making money with it?
It’s because you want to build it and then resell it?
Is it because you want to try to make $10,000 a month with it as your first goal?
It’s because you really want to learn how to do it and make money with it?
You should set your goals on at least four levels:
(I personally do my goals every month, but in the beginning, the outline below will work for you.)
A. Your first monthly goals
B. Your three-month goals
C. Your six-month goals
D. And your one-year goals
So what are some possible goals?
You can make revenue goals for each plateau.
You could have a goal that you want to make make your first sale after 30 days.
Other goals could be that you would want to have an average of 500 people a day coming to your blog after three months.
Your first goal could be to make $1000 a month
I suggest writing goals for the following categories:
A. How much traffic you want at each plateau. A good starting point would be 25 unique visitors per day after 30 days, and 100 + unique visitors on average after three months. These numbers should be much higher if you are using paid traffic techniques. (More on paid traffic later)
B. How many sales would you be making at each plateau and what are your total revenue goals at each plateau. An example of a revenue goal could be. $100 a day in the beginning and then you can shoot for $5000 a month after the first 90 days (3 months). The goal that you set up clearly up to you, these are just recommendations. Try to make goals hard to achieve but still realistically obtainable.
C. How many blog posts you’re going to be writing per month. (Remember when I said you should know your endpoint before you begin. It’s a great idea for you to spend a lot of time doing research so you can find at least 50 blog posts that you want to make). Don’t worry I know that might change over time, but it’s a great starting point.
A good goal to set for writing content is one quality post per week in the beginning.
D. How many backlinks that you want to achieve. We’ll talk more about this later but a backlink simply means having another website. Linking to yours.
You want to shoot for at least 10 quality backlinks a month in the very beginning.
So there you have it, there are some basic goals for you to think about.
Trust me when I tell you that you need to set goals.
Make them realistic, but make them difficult to achieve. That way you will always be pushing yourself.
When you start accomplishing your short-term goals, your blogging life starts to become exciting.
Step 5. Be dedicated and never give up

This is not really an actual actionable step (or set of tasks) in the blogging process, but it is important for you to set up an intangible interior mindset where you being 100% in the game (and not giving up) is the only option to achieve success.
It is extremely important that you have the right mindset, so I wanted to take a moment and
embellish on it here in this section of the masterclass.
You need to be 100% dedicated
This should be a given. You wouldn’t have found this article if this wasn’t already a given.
Be dedicated to spending at least one year working as hard as you can.
Remember that your initial ideas and thoughts and determination are what has gotten you here in the first place.
Work hard and you will achieve
If you’re not working on your blog every single day with passion and you find yourself slipping, then maybe that’s a good sign that blogging is not for you.
You need to nip that in the bud.
Most bloggers do not see results or success for over six months and they quit.
Some quit much earlier.
Do you want to know why they quit?
Because blogging is hard.
It’s a real job. There is no such thing as passive income and easy money.
So remember to be fully dedicated, follow all of my advice as well as the other many resources that you can find about blogging and marketing your blog and you will get through the trenches.
The ones that work really hard come out on the other side. The ones that do not work hard stop in the middle.
Make sure that you are dedicated to coming out of the other side.
I will do everything that I can help you come out on the other side!
I’ll see you there!
Now you are ready to start building your blog!
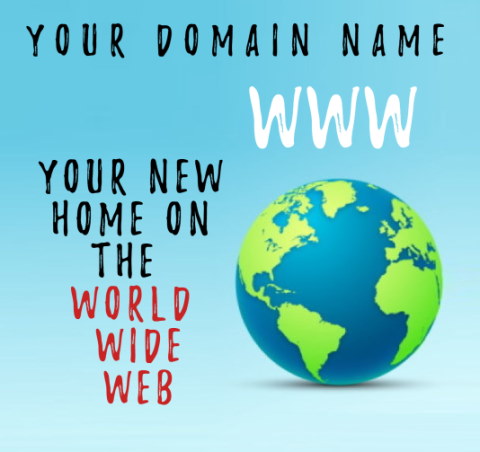
Step 6. Choosing your domain name
This is a little bit of a difficult step
The domain name is your URL www.mywebste.com
PS – You can get a free domain name for 1 year if you get your hosting as well with Bluehost.
You want to take the time and pick something very thoughtful about your blog niche.
And your brand.
Remember if you’re going to be blogging you need to build a brand
Whether you want to brand yourself personally or want to brand your name so that people know exactly what you’re doing with your blog and what you are selling, you need to take time and come up with a good domain name.
You want to make sure that your domain name is on the shorter side if possible.
You want to make sure that it is catchy or rememberable.
You want to make sure that it makes sense with your niche.
For my website, as an example, I wanted to show the world all of the fun things they could do in New Jersey.
So for my website domain name I came up with FunNewJerey.com.
For my example:
As stated previously where I illustrated I would pick a blog about tours in New York, I might come up with a name like one of these below.
Toursy. com – If I did choose a name like this which is more on the broader side I can always expand my site to do tours nationally or even worldwide! I didn’t pigeonhole myself by choosing a name like this.
Touropolis – This is another name that is on the broader side which kind of references bigger metropolis cities. I can also expand my site with this domain name.
NYTourmasters – This brands me for New York. I have made my bed with this one, and I’ll have to get ready to sleep in it.
Both options are good. It really depends on what your mindset is and how involved you want to get with your blog.
I usually recommend being very targeted when your newbie. You can concentrate on a more targeted audience in your blog has the chance to be more of an authority on its subject because your content is more targeted.
Another option is to come up with a catchy name.
I personally do not dislike these types of domain names as an option especially if they’re memorable
TripMonkey.com
ExpeditionOne.com
Voyageseeker.com
GlobeBee.com
Just for demonstration purposes here are some existing websites with their branded names.
You’ll see that these companies chose different variations
NYCgo.com
Citysightseeingnewyork.com
Newyorksightseeing.com
Tripsavvy.com
ThecrazyTourist.com
What if I can’t get the domain name I want because it is taken?
If you cant get the domain name you want, look for an alternate option.
I still recommend choosing a domain name is ends in a .com.
There are many new extensions (TLDs) out there like .co and even .tour believe it or not, but I’m still on the fence about whether you should use them or not.
If you really can’t get the domain name that you want using the .com and it is available in .co or another extension, go ahead and do it.
But just remember my recommendations to stay with a .com. It just comes across as more memorable and more professional in the long run.
Step 7. Register your domain name
Get a free domain for one year
You need a registrar for your domain name.
Bluehost is one such registrar that you can use.
One of the good things about signing up with Bluehost is that you get to pick out and register your domain for free for the first year if you purchase a hosting package (which you will need anyway).
First, you want to check to see if your desired domain name is taken.
You can do that by using the search box in Bluehost.
If your domain name is available add it to your cart and pay for it!
Domain names average around $11.99 a year.
We also recommend that if you’re serious about your project that you register your domain name for at least five years. It is also an algorithm with Google where they take you a little bit more seriously if you buy your domain name for a longer period of time.
But it is not necessary. Just a recommendation
Step 8. Set up a hosting account
The good thing about Bluehost is that you can set up hosting at the same time as well.
Bluehost has great integration with WordPress, which we will get to in the next step.
Hosting is necessary so your website can be shown on the web.
The hosting plans on Bluehost start at $2.95 per month.
Learn more about Bluehost here.
Step 9. Choose and install your WordPress theme
I highly recommend using WordPress as your content management system (CMS) because it is open source and it is free.
Note: There are two WordPress platforms. Make sure that you use Wordress.org (Not WordPress.com).
With WordPress.org you have full control of your website, your database, and all of your files and you can get a lot of cool customizations and plug-ins.
And with WordPress.org it’s easy to get any type of development done on it because everybody knows WordPress.org!
WordPress is where you will be building all of your content and uploading images.
What is a WordPress theme?
A theme is a design and layout (template) for your website
If you are creating a website with word press you need a theme.
Are WordPress themes free?
Yes, there are plenty of free themes available.
Once you set up your WordPress.org account you can look at all the free themes they have available.
To do that when you’re in your dashboard look in the left-hand navigation and then go to Appearance > Themes > Add New Theme > Popular
There are also many nice prebuilt themes out there that you can purchase or you can have one developed for you if you want something very specific.
You can also get a really nice theme at Themeisle WordPress Themes. They have a bunch of awesome themes very affordable available.
Check out their demo sites.
If you’re going to just go with the theme you simply purchase it and then download the zip file and then upload it and install it to your WordPress dashboard.
If you’re not sure how to do this you can hire somebody on Fiverr for five dollars to help you.
Step 10. Install WordPress press plug-ins that you will need
Plug-ins are sort of like apps that you can install on your website that will help you take care of many different tasks.
For the most part, a lot of the plug-ins are free.
Here are the more common ones that I recommend that you install.
To install a plugin:
In your dashboard, look in the left-hand navigation.
Mouse over plug-ins and then click on add new. Then on the right hand of the screen, you’ll see a search box where you can search plug-ins.
Type in the keyword that you are searching and available plug-ins will pop up. You can click on more details just learn about the plug-in, read reviews, and see screenshots.
When you’re satisfied click on install now, and then click on activate. This will then put the plug-in into your installed plug-in section.
You can then go into the installed plug-in section and go into the settings and see what you need to do to start utilizing the plug-in.
Not comfortable with installing plug-ins yet?
Do not worry!
Again if you’re not sure how to do this in the beginning, you can hire somebody on Fiverr to help install these for you.
But I recommend that you learn how to do it yourself for the future.
UpdraftPlus – this plug-in a unit that you back up the data on your website. It is very important because if something happens and your website crashes you might lose your previous work. It is a good idea to update your website every day or at least every time you make a post
Yoast SEO – This plug-in helps you and guides you on how to optimize your site for search engines. This plug-in is also free.
Easy table of contents – This plug-in allows you to easily add a table of contents into your posts and pages. Having a table of contents is good for your readers and for search engine optimization.
WP Rocket – This is a great plug-in to help keep your site moving at a quick speed. This is also important for search engine optimization
Insert headers and footers – This is a great plug-in that allows you to add all different kinds of tracking codes that affiliates might need and for you to add your Google Analytics code to track your site statistics. We will get into how to add your Google analytics code in step 13.
OptinMonster – This is a great plug-in that allows you to create opt-in forms that help convert potential visitors that are trying to leave your page into email subscribers and then eventually customers.
Sucuri – This helps tremendously with WordPress security. Sometimes plug-ins are corrupt and can give you a virus on your site. Sucuri offers you a firewall application that monitors malware threats and brute force attacks.
Step 11. Optimize Your WordPress Settings
There are a couple of settings that you might need to adjust to your WordPress account.
The first thing that you should do is go into the settings and then go into the general tab and add your site title, tagline, and URL.
Then while you are still in the settings area go to permalinks. Here is where you can set the default URLs for the posts that you create.
It is not suggested to use the plain, day and time, month-end date, or numerals settings/
You should use either “post name” or “custom structure”.
This will ensure that keyword-rich filenames will be created in the scenario that you forget to update your Permalink (URL when you create your blog posts.
Step 12. Design Your Blog
So now that we’ve added our plug-ins and have optimized our site settings we can play around with tweaking the design a little bit.
Most WordPress themes are pretty much ready to go right out of the box.
But if you want to play around with making some minor changes while learning the platform, you can follow the few steps below.
To make changes, you can go into the appearance section on the left-hand navigation and then to the customize section. In this area, you can upload a logo change some site color schemes, and a background image, set your site font, manage widgets and add custom CSS.
If you’re not savvy with any of this, do not worry. Simply have somebody on Fiverr do it for you so you can have your site ready to roll and ready to start adding content to it.
There is no need to worry about the structure kind of stuff. It can always be updated later.
Step 13. Plan your site hierarchy
Once you have WordPress installed, you’ll need to start planning the pages that you want to build.
You can do this in a spreadsheet.
The main pages that your site should have is a home page, an about us page, and a contact us page.
I also recommend being compliant with Google’s requirements to create disclosure, privacy, and commenting policy pages. Especially if you are doing review-based and affiliate-based marketing.
Then you should plan your top-level pages and sublevel pages
Using the new York tours example.
My top levels (with the sub-level) might be:
Bus tours NY
– double-decker tours
– hop on hop off tours
– nighttime bus tours
– sightseeing bus tours
– bus tours from New York to Niagara Falls
Adventure tours NY
– Helicopter tours
– Speed boat tours
Walking Tours
– neighborhood walking tours
– food walking tours
— food walking towards in the meatpacking district
— food walking towards in Chelsea
– barhopping tours
I hope that makes sense.
Again, we want to know our endpoint before we start!
Having everything planned and laid out makes our blogging lives simpler.
Step 14. Plan your content approach
This is when you go now and do the keyword research like I did for the tours earlier.
Get as many keywords as you can into a spreadsheet with the volumes and keyword difficulties.
Organize them in a hierarchy as we did the pages.
The goal would be to get a total of 50 pages.
And once you have 50, you can narrow down to your top 10 that you want to start with.
Remember that when you are building your list they want to pay attention to the actual keywords themselves and how difficult they are to rank for.
You’re also going to have to do your top levels first so you can place, the sub-levels underneath them.
Keep search engine optimization in the back of your mind, we’ll get into that a little bit more later but at least understand that your target keyword is going to be included in your URL, your blog post title, on your on-page content, and in your meta-tags.
Don’t worry if you fully understand this right now but here is an example:
If you are going to write a blog post about food walking tours in NY.
(And assuming that I chose Toursy.com as my domain name)
Your URL should have that keyword in it
Toursy.com/food-walking-tours-in-ny
The heading on your page might read:
46 Food Walking Tours That You Will Definitely Want to Try
Notice how I have the keyword in that heading
We will dig more into this later
15. Set up your Google search console
Step 15. Set up your Google search console
Before you do step 15 and step 16 make sure you have a Google Gmail account.
Then go to the Googe search console and create an account.
Google Search Console is where you get to communicate with Google, submit the websites that you own, see your website traffic statistics, see search statistics, find any errors that Google sees with your website, and see if there have been any penalties against your website.
After you sign in, add your website to the console and verify using the steps that they give you.
Once again. if this is too much for you right now hire someone on Fiverr to do it for $5.
The Google Search Console is also the place where you will need to upload your XML site map.
This tells Google of all of the pages that your website has
Being that you have just started your blog and you have no pages yet, you don’t have to worry about this step just yet.
Later on, after you build a few pages, you just have to create an XML site map (and upload it into The Googe search console), again which simply tells Google which pages you have created.
That is pretty much the sole function of an XML sitemap.
You can use this free online XML site map generator to create the file for you.
Step 16. Set up your Google analytics
Google analytics shows you stats about your traffic, your visitors, their online behavior, the demographics of your visitors, and much more.
You need to add your website to Google analytics and then Google will create a tracking code that you need to copy and paste into your website. You can paste it into the insert footers and headers plug-in that we mentioned in step 9.
Step 17. Set up a StatCounter Account
In conjunction with setting up a Google Analytics account, highly recommend setting up another tracking software called StatCounter.com.
StatCounter.com is free. Later when you get a bunch of traffic you can upgrade to the paid version.
StatCounter is similar to Google analytics, but it shows different metrics.
It also shows visitor traffic in real-time which is really cool.
You can see who comes to your site, what their IP address is, what city they live in, what pages they went on, how long they visit your site, what pages they left on your site.
It’s also good to have two different tracking software because none of them are 1000% accurate.
You can compare the statistics from both to get a better benchmark on how you’re website is performing and what your visitors are doing while on your website.
Step 18. Set up a Google My Business (GMB) page
If your business or service has a physical location or an official office address, or if you are targeting local customers, you should sign up for a GMB account.
Google my business allows you to set up a free account and manage how your business shows up on Google search and maps.
You simply sign up for an account, verify your business, optimize your business, and add your business name, address, hours, and photos of your business.
A fully optimized GMB listing will help you show up in the local map results.
You can also easily place and manage ads from GMB!
Step 19. Set up Cloudflare
Cloudflare is a content delivery network that helps your site with security and potential hacks as well as keeping your site super fast.
Cloudflare does offer a free version.
Step 20. Step up a branded email address
Do not use your blog brand name of the third-party email client.
If your domain name is dogheaven.com
Do not use the email name of [email protected] or dog [email protected].
I see a lot of bloggers making this mistake.
Make sure you brand your email for your domain name.
It could be your first name or could be something like info
Good examples would be:
If you’ve used our suggestion and set up your hosting account at Bluehost, you can set up a free brand email address there.
Step 21. Set up a merchant account
Whether you get involved with selling products, services either through affiliate marketing or on your own, you’ll need a way to collect and send money.
Setting up a PayPal business account is one pretty easy option that most bloggers start with.
Step 22. Start building your blog pages!
Note: Keep your posts on the draft setting until you have 2 posts complete. This way you will have content when you officially publish your site!
By this point you have all the little nuances done and you’re ready to start rocking and rolling!
In the left-hand navigation of WordPress go to pages, then “add new” page.
You should build out your basic pages first which include your homepage, the “about us” page, and the “contact us” page.
After the basic informational pages are complete, you are then ready to build your first real content page.
How long should my posts be?
I recommend that your first post be around 3000 to 5000 words.
You want to be very informational and very authoritative.
You also want to add a lot of photos and graphics.
The more high quality photos and graphics that you add the more optimized your post will be. Make sure that you add alt tags to your images.
You can use sites like Crello or Snappa to get royalty-free photos and amazing prebuilt templates that are easy to edit.
Pexels offers a large royalty-free selection of photos as does Pixabay. that you can use for free.
Make sure your graphics are beautiful and of high quality.
You can use a tool like Photoshop to manipulate photos or you can use a great tool that is 100% free that was made by some students from Rutgers University called paint.net.
If you click on that link, click on the free download now link in the upper right-hand corner of the page.
You can also check out Creative Fabrica to obtain incredible (and very affordable) stockphotos!
How long should the average blog post take me to write?
You should spend at least 8 to 16 hours on each blog post.
Yes, you read that correctly!
If you are not taking your time to do full research and write authoritative content with a lot of high-quality graphics and you are not blogging in the correct fashion.
Quality matters way much more than quantity
You would be better off writing for 4 to 6 really quality blog posts a month than you would be to write 15 quick 500-word blog posts.
A lot of bloggers make this mistake in the beginning and they think that they need to build out massive content.
While in theory, it’s true you do need to build out some massive content over time, and you should always be building.
But you want to make sure that your content is better than your competitors.
Your content should be well thought out, well laid out, and extremely authoritative on your subject.
You want to portray yourself as an expert in your field.
That is how you build up your brand and that is how you build up trust.
The contradiction
I know I just said that quality matters more than quantity.
And while that is true, the real problem is that you need a lot of quality content articles.
And you need to produce them as fast as you can.
I still want to stress how important it is for the quality, however.
But the real secret sauce is to get as many high-quality affiliate-based articles as quickly as you can and you want to get as many quality links pointing back to those articles as you can.
Outsource your writing
To be able to do this, you’ll have to outsource the work.
So you’re going to have to have some sort of budget.
Good quality writers get somewhere between $50 and $100 for a 2000 word article.
Excellent writers cost even more than that.
But look at it from a business perspective in that it’s an investment.
You’ll need to get a really good quality writer or 2 and have them produce content for you.
This is actually quite difficult to achieve initially because you’ll go through more than just a few writers that just aren’t up to your standards.
But you have to keep trying.
Once you find a writer that has skills, you will be on your way.
Step 23. Optimize Your Content
A little bit about search engine optimization
Here is a quick crash course
Think of every page that you build on your website as being a book.
A book that can show up on Google.
So just like a book sits in a library, books sit in Google.
So to optimize each one of your pages you need to do the following 5 initial steps.
1. Write a keyword-rich file name (also known as the permalink in WordPress, slug on other web builders)
But simply what it is, is your URL
An example would be:
toursy.com/hop-on-hop-off-bus-tours-ny
All of the letters n the words should be lowercase and all words should be separated by a dash.
2. Write your meta-title tag with the Yost SEO plug-in.
Think of this as the title of your book.
This is one of the most important tags that you will write for each page.
This is what shows up in Google that people click on.
The title of your book (or what is officially called the meta-title tag) should be 60 characters or less.
When you are coming up with the meta titles for your blog, you want to make them seem larger-than-life.
You want them to be very catchy and very topical.
If you are writing a blog post about “Hop on hop off bus tours in New York City”
Instead of using this below as a meta title tag:
Hop on Bus Tours in New York
A better title would be:
16 of Our Absolute Favorite Hop on Hop off Bus Tours in NYC
By the way, that second meta-title directly above is 59 characters!
You can go over by a few characters but try to stick to keeping them around 55 or 60 characters.
Also, note that my keyword that I’m trying to rank for is in the title.
We call it the primary keyword, in this case, it is “Hop on Bus Tours in New York”.
3. Write your meta-title description with the Yost SEO plug-in.
Think of your description as the synopsis that appears on the back cover of your book.
This tells Google as well as people that are visiting Google what the pages that you have built are about.
The meta description tag should be 160 characters or less.
Here’s an example of a good description tag:
“We have tried every bus tour available in New York and here are 16 of our favorite hop on and hop off bus tours. Read our story of why we chose each one as our favorite.”
It is very topical and tells you exactly what you’re going to be getting when you open up that book (or page really). Remember we just comparing blog posts to books as an analogy.
4. Write a compelling heading for your article.
This is done on the top of your blog post and you created right in the WordPress editor.
WordPress automatically wraps your page name with a heading tag <H1>Your Heading Here</H>
Think of your heading as the big black bold lettering in a newspaper.
There is usually a heading on every article in the newspaper and on a blog post.
The heading should be catchy and compelling and should include your primary keyword.
It should be a little bit different than the meta-title tag as well.
An example of a good page heading would be
“If You’re Visiting New York, Here Are 16 of Our Favorite Hop on Hop off Bus Tours and the Reasons Why We Chose Them”
There are no restrictions for characters when writing headings.
I usually like to keep them around 120 characters or less.
The example above is 115 characters.
5. Use your primary keywords and related keywords in your content
We mentioned earlier that you should be writing at least 3000 words of content.
In that content use your primary keyword, which in this scenario is “Hop on Hop off Bus Tours”
And use variations and similar types of keyword versions of it
It helps Google to understand the context of your page.
The art of doing this in your page content is called latent semantic indexing.
But it simply means is to use synonyms and related types of keywords.
Good examples would be:
Best hop on hop off bus excursions
Hop on hop off one-day bus passes
NYC hop on hop off bus trips
NYC sightseeing bus hop on hop off
Some of the variations that I did of these examples above is that I put NYC at the beginning of the keyword instead of at the end.
I used other words instead of the word tours like “excursion”, and “trips”.
I use some words that other people might type in like “best” and “sightseeing”.
This can be tough for new marketers.
But I recommend you using software like Ahrefs where they have great tools for you to explore keywords in the variations easily.
Other SEO tips include adding additional headings on your page
In the WordPress editor, you can easily highlight your heading and then use the drop-down to choose an H2, H3, H4, and H5.
It is a good idea to separate your article into different headings.
So in our example above our H1 (first top page heading) was
“If You’re Visiting New York, Here Are 16 of Our Favorite Hop on Hop off Bus Tours and the Reasons Why We Chose Them”
Later in the article, you can drill down into different subheadings
Here are some good ideas:
<H2> These Hop on Hop off Bus Tours Are Less Than One Hour in Length </H2>
Then you can write content below this heading for people that don’t have much time and I just want to go on a quick tour.
<H3> Barhopping Hop on Hop off Bus Stores!</H3>
Then you could talk about bus tours that stop at some of the best bars in New York.
Another tip is to add internal links to other important pages
When you get to the end of the hop on hop off bus stores you can add a related page like “here are bus tours that show you where famous people live in NYC”.
Related blog articles help your existing readers to stay on your website and go to another page to read and Google also loves to see a lot of internal links linking to other pages.
Make sure to check with your SEO Yost plug-in for their recommendations
The Yoast SEO recommendations appear at the bottom of your post in the WordPress editor
They point out cool stuff like “hey you missed your keyword in your description tag.”
You can go in and fix little things like that to help your site ranked higher.
Optimize Your Images
Make sure you ony use high quality images.
Step 24. Publish Your Blog!

After you have 2 blog posts completed.
You can now take them off of draft status and hit publish so the world can see them!
Step 25. Create Your Social Media Accounts
You should at least create a Facebook, Twitter, Instagram, and YouTube account in the beginning.
Add share buttons to your blog by using a social media share plug-in.
After your first two posts that are now live on your blog, create a few social media posts, and boost them. (Spend a few dollars to promote them to get some engagement).
Step 26. Define your blogging production schedule
We talked about this in step 4 when we were planning and setting our goals of how many blog posts a month that we wanted to produce.
Okay, so it was in a spreadsheet (or was at least supposed to be) of our goals way back when.
If you’ve failed to do that, go back to that step, open up your spreadsheet, and get your future blog post ideas in there.
Now is the time to set a grueling schedule to produce content.
Set a goal of a number of posts that you would like to achieve per month.
Try to publish the most amazing, informational, and authoritative content that you can!
I cannot stress this next point enough:
You need to produce content. (High-quality content)
Build Content, content, content, content, and content!
Hire friends and family, or outsource it.
Work all day and all night, I don’t care.
I know that what I am saying doesn’t come off as very friendly.
But guess what?
We’ve decided together that we want to be bloggers.
And this is the true reality of it.
Build amazing content
If you go back to step 4 – C in this post you will see that we should have set up a list of at least 50 blog posts ideas in advance.
If you’ve failed to do that go back to that step, open up your spreadsheet, and get your 50 future blog post ideas in there.
Then take the time to add even more future post ideas.
You should be working on building a well-oiled blogging machine at this point
You should always be doing keyword research in your niche and looking for new blog post ideas and new low-hanging fruit of uncompetitive keywords to target and write about.
And you should be concentrating on building and pumping out quality authoritative blog content
There is no easy money.
There is only writing day and night about our expertise in the field or niche that we have chosen.
It’s (blogging) can be harder and way more demanding than a real 9-to-5 job, believe it or not.
A lot of us bloggers didn’t realize that when we signed up.
I am just trying to keep it real.
If you do not heed this advice, failure is imminent.
Repurpose your content
Take your blog posts and make them into videos and podcasts.
Be aggressive.
If you want to have an edge against your competitors, build content, repurpose it, and then promote it heavily on as many platforms as you can. (Promotion is coming up in step 26!)
Step 27. Always be Refining your USP
We’re talking about your unique selling proposition and what makes you stand out above your competitors.
Why do your visitors look at you as an authority?
What you are willing to sacrifice and give back as far as value proposition goes to get full trust from your audience?
You should be willing to give it all and willing to go to any measure to accommodate your audience.
That is the secret to the success of blogging in this era.
Add as much value as you can and try to build a loyal following
In this day and age, your readers want value.
They want solutions to their problems.
They want answers to their questions.
Be relatable to your audience.
Aim to be as helpful as you can!
Don’t be afraid to send your audience to some off-page trusted resources. If you send them off your site with information that will be truly helpful to them, it will help build trust.
Most bloggers believe that if they sent somebody off-site they have lost their potential visitor customer forever.
This is absolutely not true.
People trust trusted recommendations from trusted sources.
Tell your story!
That is how you build a brand.
People trust real stories told by real people that have dealt with or have had the same problem or hurdle to overcome as they have.
Be genuine!
If you are truly genuine people can taste it!
Trust me your audience and demographic are no fools.
So never try to pull the wool over their eyes, because they will know immediately.
Teach every single thing you know
Give away the secret sauce.
Reveal you’re innermost knowledge.
Teach your audience unselfishly from your heart.
And you will have a trusted following for the rest of your life.
Step 28. Blog Promotion
Now that you have a few blog posts published live, we need to learn how to promote your new business and brand and get the word out there!
This is an important step that novice bloggers, in the beginning, fail at.
As matter of fact, I’ve witnessed many talented advanced bloggers who also don’t spend enough time in the promotion phase.
A lot of bloggers post a lot of content and just move on to the next piece of content without promotion, marketing, or without doing the best they can with search engine optimization techniques.
I used to be one of those culprits! It’s because when I first started I just didn’t know any better.
If all this sounds difficult, fear not!
I’m an open your eyes to some really cool techniques to get your blog going and rolling right off the bat!
It’s nothing to be intimidated about.
Social Media
This is the first place you should start with the promotion of your new blog.
Decide which of the platforms are best suited to your niche and create accounts for them
I have already recommended in step 23 to create at least a Facebook, Twitter, Instagram, and YouTube account.
But there are other exciting Social media options including Tick-Tock, Reddit, Pinterest, LinkedIn, and Snapchat.
Here is a quick (generalized) guide of which platforms are best for what type of content
Facebook – Networking with friends and groups. This platform does well with videos as well.
Twitter – News, Ads are in-stream. Has geat tailored audiences
TikTok – Younger demographic. Great for school and homework niches.
Instagram – A very visual platform great for personal brands.
YouTube – Of course video!
LinkedIn – Professional services, employee networking.
Pinterest – All types of visual content, infographics, photo guides.
Reddit – Very high-quality conversations about niche-related topics.
I know that choosing and managing one or more of these platforms sounds a little overwhelming for you to handle because you are only one person.
But if you want to accelerate your path to success you have to start thinking about outsourcing some of these options or hiring an in-house person.
Submit to bookmarking sites
Submitting your website to bookmarking sites can help you to get traffic as well as quality backlinks from high authority websites.
Examples of bookmarking websites are:
Twitter, StumbleUpon, Reddit, Digg, Pinterest, scoop.it, Pocket, We Heart It, Fark, BizSugar
Tell Your Friends
Sounds obvious, but just wanted to remind you! Posted on your social media and ask your friends to check out your new endeavor!
In the next few steps are going to talk more specifically about promotion and the strategies of how to do it.
Step 29. Build an Email List
Every blogger and I don’t care who you are have made this mistake of not collecting email addresses of their visitors in the beginning (or ever).
Including me!
If you haven’t done this already as per our recommendations in the plug-in section (Step 10) where we mentioned OptinMonster.
Go ahead and do it now.
This plug-in pops up an opt-in email box when visitors are getting ready to leave and asks them to subscribe to your newsletter so you can collect their information.
This way you get their name and email address so you can market to them later.
Don’t let your visitors leave you forever
Think about all the people that might visit your site and be forever and never had the chance to ask them for their information.
Retargeting people through their email with promotions, products, and services is one of the best ways to generate income for your blog.
Why build an email list?
You will get sales!
Studies show, year after year (and yes still in the 2020s) that email marketing is still the most effective way of marketing and engaging with your potential customers.
Let me repeat that, it’s THE BEST best marketing vehicle available to blog owners.
If you send emails that give value to your customers, they will never unsubscribe.
They may not buy today, but studies show that the stickiness of being on your email list is a big advantage for your business.
Because if you build enough trust and value with that potential customer over time they will eventually convert.
And you will get the sale.
Think about that:
You can resell one of your existing HAPPY customers with an email without having to spend any money on new client acquisition.
Step 30. Get Backlinks
In order to get good quality backlinks, you’ll need to do some outreach to other bloggers in your vertical.
What does that mean?
You want to build relationships with other bloggers and influencers in your niche.
You want to be able to provide value to them.
Creating a relationship is not one-sided and it’s not just for you.
To be successful at doing outreach you want to make sure that you’re not spamming anybody in your intent is to truly provide value.
Ideas on how to provide value
A. Maybe you can provide some really quality content because you have a lot of knowledge that would help match the interests of their audience.
B. You could do keyword research on their website and find some low hanging fruit of keywords that they are currently not targeting. Other bloggers and webmasters would love for you to offer up some strong advice on an easy keyword that they should be targeting.
C. You can provide an extremely powerful piece of content on your blog that’s helpful for the blog that you are outreaching to where they may want to share it. For example, imagine you are in the travel niche in New York City and you made a really awesome content piece on how to get people (through the use of mass transit) on how to get from each borough to get to all of the New Jersey shore point beaches as well as New York beaches.
You could outreach to the New York City Transit Authority, New Jersey transit, all of the bed and breakfast in hotels that are near the beaches, and asked them to share your content. Or link back to it
In many cases, if it helps their users and they don’t have that extensive content on their site, they will share it.
You’ve provided them value.
Secret Sauce
Think about your blog as an information business.
Instead of writing for your audience all the time, try writing for other businesses that would link to your content.
Think about it, if you were a baby mom blogger and you wrote a great informational article on how to save money on buying baby clothes.
That is great for all the moms out there.
But guess what, most of your audience won’t have websites, and they certainly won’t link to you if they don’t have a website.
Here is a great idea
But what if you wrote an extensive piece about one of your favorite local baby consignment shops.
After you wrote it, you simply outreach to the owner and ask them to link to you!
PS
In that article, you could also add affiliate links to online content baby consignment shops which would give you a chance to make affiliate sales!
If you are not fully understanding this section and how to do creative outreach and get backlinks, that’s okay.
Simply go back and read it again.
Then come up with some ideas where you can create relationships.
Start a spreadsheet, and put a list of all the websites that you can outreach to.
You can also outsource the process of outreaching on Fiverr.
Pitching guest posts
For this strategy, you simply email the owners of websites that you are interested in getting a backlink from and ask them if you can create a guest post of quality content for their website.
In return for your efforts in writing some really good quality content, you can get rewarded with a link back to your website from your article.
You can also outsource this strategy.
Just make sure that you’re pitching relevant sites.
You want to make sure that you are getting links on quality websites.
Step 31. Affiliate Marketing
In my opinion, all bloggers should get involved in affiliate marketing.
Affiliate marketing is a great way to monetize your site.
Check out our in-depth guide on how to start in affiliate marketing.
Also, see:
| Best Affiliate Niches | Best Affiliate Networks to Join | Affiliate Marketing Myths Debunked |
We highly recommend this affiliate marketing course
Authority Hacker offers an in-depth course, you will learn everything that we are teaching you here but a little bit more in-depth.
Step 32. Media Buying
Start running paid ads
This is very important for you to do at the very beginning so you can start making some money right away.
The most common platforms are Google Ads, Microsoft ads, Facebook ads, YouTube ads, and Instagram ads..
If you’re not sure how to place ads you can outsource it.
Or you can take a course on how to do it.
I do recommend taking a course if you’re not too sure.
But ultimately running paid ads is a skill that you definitely need to learn especially if you want to scale your business.
But there are a lot of other platforms including Twitter, Tik-Tok, Pinterest, Amazon, and LinkedIn
There are also a lot of great ad networks. Here are just a few
RevContent
ONE by AOL
Airpush
Inmobi
SiteScout
Adknowledge
Plenty of Fish
Taboola
Step 33. Other ways to monetize your site
Serve ads on your blog
If you’re getting some decent traffic, you can run ads on your website.
It doesn’t matter what your niche is, you’ll always be able to run ads.
Google AdSense is a great way to start monetizing your traffic.
You can also charge people to put banners on your web pages.
Selling products | Dropshipping
This may have been your intention from the beginning and you might have an e-commerce site, but if not you can always add on e-commerce to a plug-in called Woocommerce.
After you get Woocommerce installed, you can start to load up products from drop shippers easily with the Spocket App.
See our complete review of Spocket and how it works.
Spocket makes it super easy to get products really don’t have to go around searching for drop shippers. They have dozens of them already inside the app.
Selling products | Physical Products
You may also have your own products that you shipped directly to the consumer yourself.
You can do this directly from your website from just a single page that you build or with a plug-in or you can use an e-commerce platform.
Selling services
You can sell any type of service that you offer whether it be consulting advice or maybe you’re in the business of helping people to repair their credit.
There are literally thousands of options.
Selling courses
You can create your own course and sell that on your website.
If you’re in the search engine optimization business, you can sell a course on how to do keyword research as an example.
Selling e-books
You could take information on your blog and sell it as a downloadable e-book.
You can sell it directly from your blog or you can sell it on other platforms.
Selling sponsored posts
There are plenty of advertisers that seek exposure in their vertical or similar verticals and they would be willing to pay to get their products or services in front of your visitors.
Advertisers may also want to publish sponsored posts (content pieces) on your blog.
I wish you luck on your blogging journey!
Please know that I am here if you need any help with any questions about blogging.
Please post any questions below, and I will get right on it.
Take the Authority Hacker affiliate marketing course to hone your skills and greatly improve your chances of success.
Other helpful related resources
Take a peek at our top-level page where you can find the best work From Home Jobs in NJ.
The Best Ways to Make Money Online – Make real money from the comfort of your own home!
Best Businesses to Start – Start a business or side hustle today.
How to Start a Blog – This article will teach you how to build a blog from scratch.
How to Start in Affiliate Marketing – Here’s a quick primer on how to get started in affiliate marketing.
Best Affiliate Niches – Picking a niche has never been easier!
Best Affiliate Networks to Join– Find awesome affiliate products to narket.
Affiliate Marketing Myths Debunked – The truth about affiliate marketing and what you can expect.
Starting a Business in NJ – A complete step-by-step guide – Learn how to create your business entity in NJ.
Best online Courses – Find online courses that you can take to improve your digital marketing skills.